For most segmental block walls up to 4 feet tall, plan on a trench about 12 inches deep: 6 inches of compacted crushed stone base topped by one full buried course of block, which meets the embedment minimum. Below 2 feet, 6 inches of embedment is usually enough. Above 4 feet, or on soft, wet, or sloped sites, that depth grows and you’re often looking at an engineered design. When your yard doesn’t match the easy case, consider getting a professional site evaluation before you dig.
TL;DR:
- Proper embedment depth varies with wall height and site conditions, typically ranging from six inches for small walls to full block courses for taller or sloped sites.
- The base must be well-compacted in lifts of 2 to 3 inches, with a minimum of six inches of gravel beneath the first block, and deeper on soft or wet soils.
- Effective drainage behind the wall, including weep holes or perforated pipes, is essential to prevent hydrostatic pressure and failure, especially above four feet.
- Sloped toes, poor soil, frost, and other site-specific factors require adjustments beyond standard guidelines, sometimes needing sub-excavation or engineered design.
- Walls over four feet tall, near structures, or built on problematic soils should be designed by professionals with site-specific evaluation and proper reinforcement techniques.
Table of Contents
- How Deep Should a Retaining Wall Footing Be?
- Leveling Pad and Base Depth: Getting the Foundation Right
- Drainage Behind the Wall: Where It Fits in the Trench
- Soil, Frost, and Slope Conditions That Change Your Depth
- When You Need Engineered Design or Geogrid Reinforcement
- Your Trench and Footing Checklist, Step by Step
- What 25+ Years of Wall-Building Teaches You About Footings
- How Do You Check if Your Soil Can Support the Wall?
- Do You Need a Permit for Your Retaining Wall?
- Keeping Your Footing Stable for the Long Haul
- What Homeowners Get Wrong About Footing Depth
- Professional Installation for Walls Built to Last
- Sources
- FAQ
How Deep Should a Retaining Wall Footing Be?
The 1/3 rule gets repeated everywhere: bury one third of your total wall height. It’s a fast mental shortcut, and for a rough gut check it’s not terrible. But it’s also not an engineering standard, and treating it like one is where DIY walls get into trouble.
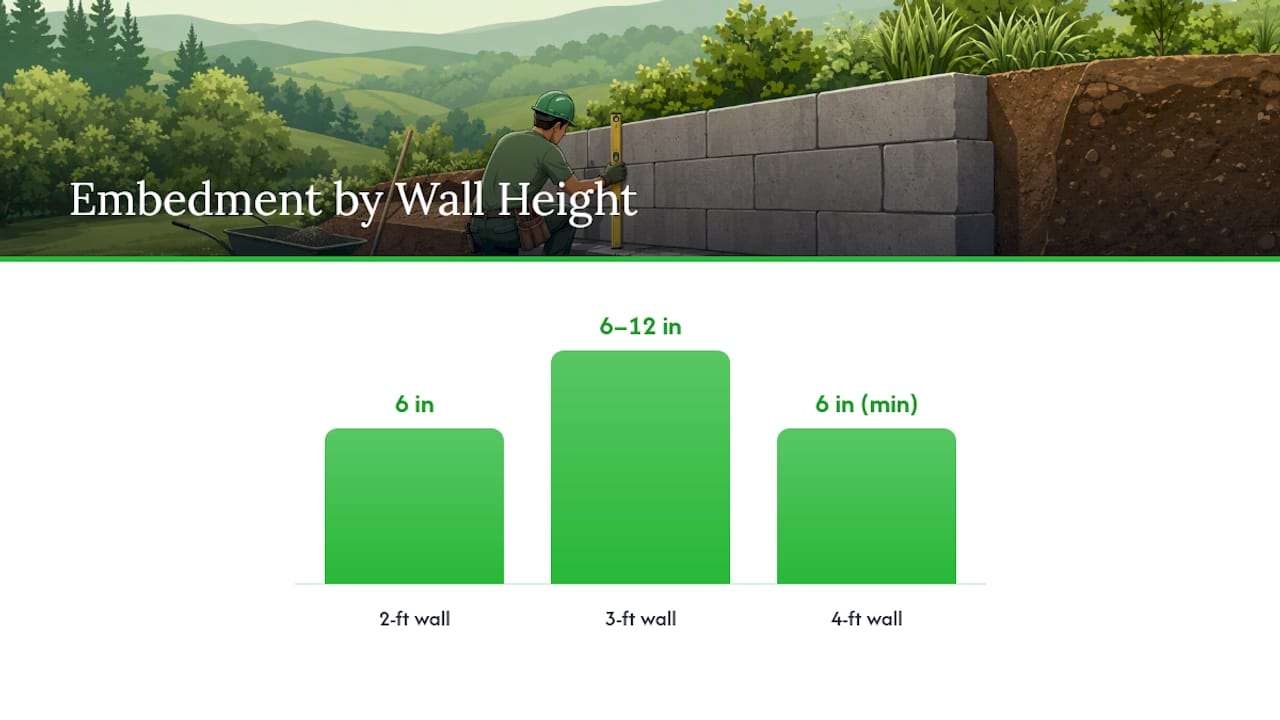
The Segmental Retaining Wall Design guidance from CMHA sets a firmer floor: a minimum embedment of at least 6 inches for small walls, with tables that adjust the number based on wall height and the slope of the toe in front of the wall. Keystone’s embedment guidance echoes this, putting minimum practical embedment at roughly one block unit, about 6 inches, below finished grade.
Here’s how that plays out on real walls:
- 2-foot wall: 6 inches of embedment is typically sufficient on level, well-draining ground.
- 3-foot wall: plan for 6 to 12 inches, leaning toward the higher end if the soil is soft or the site holds water after rain.
- 4-foot wall: bury a full course of block at minimum, and start asking whether you’re approaching the point where an engineered design takes over.
The 1/3 rule breaks down fastest on sloped toes. If the ground in front of your wall drops away instead of staying level, you lose passive soil resistance, and manufacturer tables call for extra embedment to compensate. A wall that would need only 6 inches on flat ground might need considerably more with a sloping toe. This is exactly why block manufacturers publish embedment charts instead of a single number: geometry and site conditions change the math.
Leveling Pad and Base Depth: Getting the Foundation Right
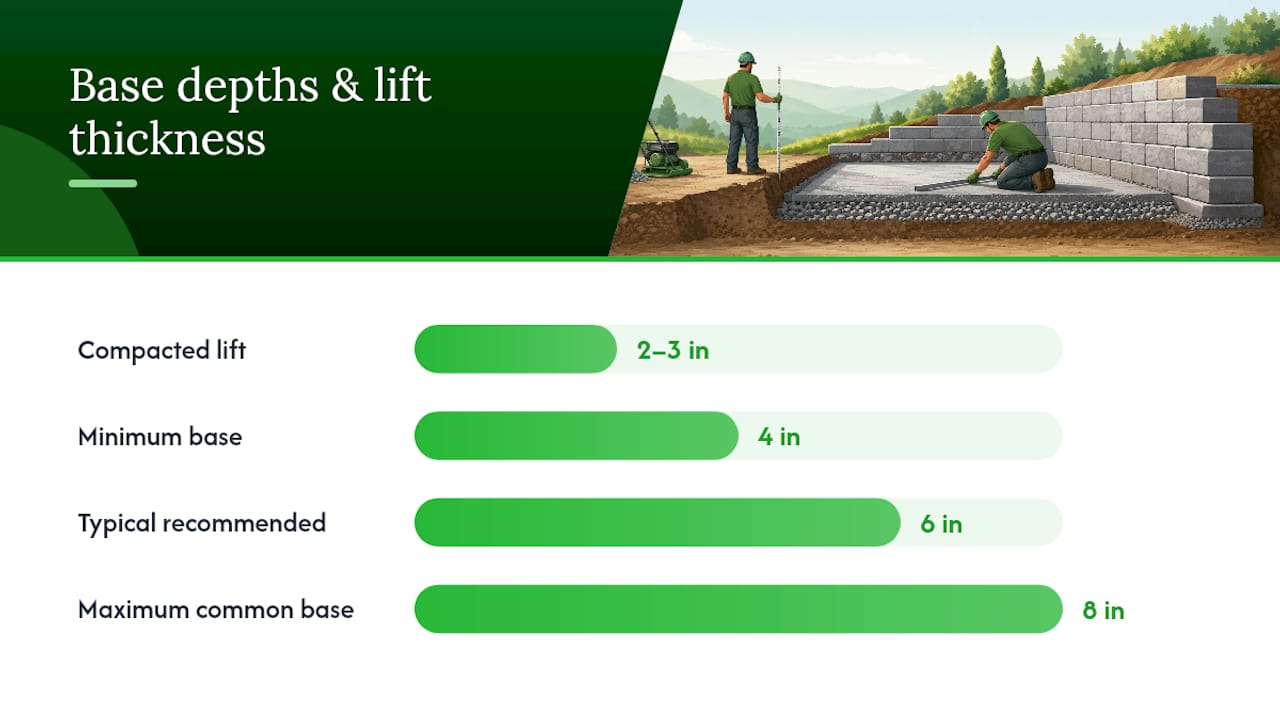
The base is arguably more important than the embedment number itself, because a poorly compacted base undermines everything built on top of it. Nicolock’s retaining wall guidance recommends 6 inches of compacted gravel beneath the first buried course for typical segmental systems, which is where that 12-inch trench figure for a 4-foot wall comes from: 6 inches of base plus one buried course.
That said, base depth isn’t fixed. Depending on the block system and soil, compacted base depth commonly ranges from 4 to 8 inches. Softer soils push you toward the higher end.
Trench width matters just as much as depth. Dig wide enough to extend past both the front and back faces of the wall, typically the block’s width plus 12 to 24 inches, and go wider still on soft or sandy soils where you need more bearing surface.
To build the base correctly:
- Excavate to your planned depth across the full trench width.
- Lay geotextile fabric across the subgrade if the soil is soft or silty, separating it from the clean stone above.
- Place crushed stone in lifts of 2 to 3 inches, never dumping the full depth at once.
- Compact each lift with a plate compactor before adding the next.
- Check the surface with a level across both the length and width of the trench, correcting low spots before setting block.
Pro Tip: Rent the plate compactor for a full day, not a few hours. Most DIY base failures come from rushing compaction because the rental clock is running, not from choosing the wrong stone.
Skip the compaction step and you’re building on air pockets that will settle unevenly under the wall’s weight within a season or two.
Drainage Behind the Wall: Where It Fits in the Trench
Drainage failures cause more retaining wall problems than shallow footings do. Water trapped behind a wall builds hydrostatic pressure, and that pressure pushes outward against the block far harder than soil alone ever would, undermining even a correctly built base from behind.
The drainage rule of thumb splits cleanly by wall height. For walls under 4 feet, weep holes spaced about every 4 feet horizontally are usually enough to relieve pressure. Once you cross 4 feet, a 4-inch perforated drainage pipe bedded in crushed stone behind the base becomes the standard recommendation, not an upgrade.
Insufficient drainage is one of the most common causes of retaining wall failure, often outpacing shallow footings as the actual reason a wall bulges or collapses.
A typical drainage detail looks like this:
- Perforated pipe runs along the base of the wall, wrapped or set in a bed of stone.
- The drainage zone behind the wall is roughly 12 inches deep, filled with clean, angular stone with no fines so water moves freely instead of pooling.
- Pipe outlets need somewhere to discharge, daylighting at a lower point on the property or tying into a drain system.
- Pipe should slope gently toward its outlet rather than running dead level.
If your yard already struggles with standing water, that’s not just a drainage question anymore. It’s a sign the whole wall design needs a second look, which is where dedicated drainage planning pays for itself before block ever gets set.
Soil, Frost, and Slope Conditions That Change Your Depth
Standard footing numbers assume decent soil, flat ground, and normal groundwater. Change any of those, and the numbers change with them.
Soft, clay-heavy, or chronically wet soil can’t bear as much load per square inch as firm, well-drained soil. On these sites, expect to dig deeper and wider than the standard trench, and in some cases sub-excavate the soft material entirely and replace it with compacted stone before you even start building the base.
Frost heave is the other quiet threat. In regions with real winter freeze, water in the soil beneath a shallow footing can freeze, expand, and lift the wall out of position. Check your local frost depth before finalizing your trench, and lean toward deeper embedment or added base insulation in colder climates rather than guessing.
Slope conditions deserve their own checklist:
- A sloping toe in front of the wall reduces the soil’s ability to resist outward pressure, which is why embedment tables increase depth requirements as toe slope steepens.
- Benching, cutting stepped, level platforms into a slope, is often necessary on hillside sites so each wall section sits on solid, level bearing ground.
- Exposed toe slopes may need erosion protection, like rock or planting, to keep the base from washing out over time.
If your site checks any of these boxes, a slope-specific planning approach will save you from discovering the problem after the wall is built.
When You Need Engineered Design or Geogrid Reinforcement
Most residential retaining walls hit a common threshold around 4 feet of exposed height. Cross that line and you’re typically looking at engineered design, which usually brings geogrid reinforcement and a longer base into the picture.
Geogrid works by extending mesh fabric back into the compacted soil behind the wall, tying the wall face to the reinforced soil mass behind it. Manufacturer design tables set geogrid length in proportion to wall height, with vertical spacing guidance specific to each product, which is one more reason checking your block system’s own charts matters more than following a generic number pulled from a different product line.
Beyond height alone, a few site conditions should send you toward an engineer regardless of wall height:
- Structures, driveways, or foundations sitting close behind the wall.
- Vehicle loads or parking areas above or near the wall.
- A sloping backslope adding extra soil weight behind the wall.
- Unusual surcharges, like a pool, shed, or retaining structure stacked above your wall.
- Soils that tested poor or unpredictable during excavation.
A geogrid retaining wall guide walks through these thresholds in more detail if you’re on the fence about whether your project needs one.
Your Trench and Footing Checklist, Step by Step
Building the footing right is mostly about sequence. Skip a step out of order and you’ll be redoing work.
- Mark and stake the wall’s planned location, checking both alignment and any elevation changes across the run.
- Call 811 before any digging begins, no exceptions, to get utility lines marked.
- Dig the trench to your planned depth and width across the full length of the wall.
- Lay geotextile fabric if your subgrade is soft, silty, or shows signs of poor drainage.
- Add and compact base stone in 2 to 3 inch lifts, checking level as you go.
- Set the buried course of block, confirming it sits level front to back and side to side.
- Install drainage pipe and stone behind the base course before backfilling further.
- Backfill in lifts, compacting each layer rather than dumping and walking away.
- Finish grading the surface so water sheds away from the wall, not toward it.
Tools worth having on hand: a plate compactor (rented by the day), a hand tamper for tight spots, a 4-foot level, a shovel and mattock, clean angular crushed stone, geotextile fabric, and perforated drainage pipe.
Pro Tip: If your excavation is more than a couple feet deep or spans a long run, price out a mini excavator rental. It’s often cheaper than the extra weekend you’ll spend hand digging, and it keeps your trench walls straighter.
Stop and call a professional if you hit standing water you can’t explain, unmarked utility lines, or subgrade so soft it won’t hold a footprint without squishing. Those aren’t DIY problems to dig through; they’re design problems to solve first.
What 25+ Years of Wall-Building Teaches You About Footings
Manufacturer tables and CMHA guidance get you most of the way there, and Precision Outdoor Solutions follows them as the baseline on every job. But tables assume average conditions, and Wentzville-area yards don’t always cooperate.
On a straightforward backyard wall, level ground, decent soil, under 3 feet, the standard 6-inch base and matching embedment usually hold without adjustment. On a problem site, a low spot that holds water every spring, or a yard with visible clay right under the topsoil, the practical move is to upsize base depth by an inch or two and widen the trench rather than jump straight to a full engineered redesign for a wall that’s still under 4 feet.
That judgment call, knowing when a small adjustment solves the problem versus when the site genuinely needs an engineer, is where experience earns its keep. It’s not always in a table.
A typical contractor visit for a retaining wall project includes a soil check by hand and by eye, guidance on whether your local jurisdiction requires a permit for the wall height you’re planning, a written quote, and a realistic timeline based on site access and weather. None of that replaces the manufacturer charts. It just tells you which chart applies to your yard.
How Do You Check if Your Soil Can Support the Wall?
You don’t need a geotechnical lab to get a useful read on bearing capacity, though a formal soil report is worth the cost on larger or engineered projects.
A simple field check starts with a shovel. Dig down to your planned base depth and look at what you’re standing on. Firm, well-drained soil that holds its shape when you compact it by hand is a good sign. Soil that’s soft, squishes underfoot, or turns to mud within a day of rain is a warning that standard base depths won’t be enough without modification.
A pocket penetrometer, a simple handheld tool contractors sometimes carry, gives a rough numeric read on soil resistance right at the trench bottom. It won’t replace a full geotechnical evaluation, but it flags soft spots before you pour a single stone.
Watch for these signals that your soil needs a deeper look:
- Water seeping into the trench within minutes of digging, even on a dry day.
- Soil that changes texture noticeably at different depths, sand over clay, or fill dirt over natural ground.
- Any area where a previous structure, tree stump, or utility trench was backfilled, since disturbed soil rarely compacts as reliably as undisturbed ground.
When any of these show up, sub-excavating the questionable soil and replacing it with compacted crushed stone is usually cheaper than repairing a wall that’s shifted a year later. For anything beyond a small garden wall, a short conversation with a geotechnical engineer or an experienced local contractor is worth the cost before you commit to a final depth.
Do You Need a Permit for Your Retaining Wall?
Permit thresholds for retaining walls vary by city and county, but a common pattern shows up across most jurisdictions: walls under a certain exposed height, often somewhere around 3 to 4 feet, are frequently exempt from permitting, while taller walls require a permit and sometimes stamped engineering drawings.
That threshold isn’t universal, and it’s not something to assume from a neighbor’s project or a forum post. St. Charles County and its surrounding municipalities, including Wentzville, St. Peters, and O’Fallon, each set their own specific requirements, and those requirements can change. Before you dig, check with your local building department directly.
Permitting isn’t just a legal formality. In many areas, the same height threshold that triggers a permit also triggers a requirement for engineered design, meaning the footing depth and reinforcement details on your project may no longer be something you can size from a manufacturer’s DIY table alone. If your wall is anywhere close to that borderline height, it’s worth a phone call to your local permit office before you finalize your trench dimensions, not after.
If the process feels like one more unknown to navigate, that’s a reasonable moment to bring in a contractor who already knows the local rules and can build the permit conversation into the project timeline from day one.
Keeping Your Footing Stable for the Long Haul
A well-built footing isn’t a one-and-done job. Retaining walls settle, shift, and respond to seasons over their lifespan, and catching small movement early is far cheaper than rebuilding a section later.
Walk your wall a couple of times a year, ideally once after winter and once after a heavy rain stretch, and look for specific warning signs rather than just a general glance. Bulging anywhere along the wall face suggests hydrostatic pressure building up behind the block, often a drainage problem more than a footing problem. Gaps opening between blocks, or a section that’s visibly leaning compared to the rest of the run, point to base movement that started at the footing level.
Also check the ground directly behind and in front of the wall. Standing water pooling behind the wall after rain means your drainage system isn’t clearing water fast enough, and that pressure works against your footing over time even if the base was built correctly. Soil eroding away from the toe in front of the wall reduces the resistance your embedment depends on, which is the same mechanism that made sloped toes require deeper embedment in the first place.
Small cracks in mortar joints (on mortared walls) or minor efflorescence, the white mineral staining from water moving through stone, are usually cosmetic. A wall segment that’s visibly out of plumb by more than an inch or two is not, and it’s worth a professional look before it progresses further.
What Homeowners Get Wrong About Footing Depth
The biggest misconception isn’t about depth at all. It’s the assumption that one number, whether it’s the 1/3 rule or a flat “12 inches deep,” applies to every yard and every wall. It doesn’t, and treating a rough guideline as a precise spec is how walls that looked fine on installation day start bulging two winters later.
The conventional advice tends to fixate on embedment because it’s the easiest number to quote. In practice, drainage decisions and base compaction matter just as much, arguably more, since a well-drained wall on a slightly shallow footing tends to outlast a deep footing sitting behind a soggy, unrelieved backfill. If you’re only going to get one thing right, get the base compaction and drainage right before you obsess over an extra inch of embedment.
What we’d tell any homeowner planning a wall: start with the manufacturer’s own design table for the block system you’re using, treat CMHA’s minimums as a floor rather than a target, and walk your site after a hard rain before you finalize any numbers. The ground will tell you more than any rule of thumb can.
— Precision Outdoor Solutions
Professional Installation for Walls Built to Last
Professional contractors cross-check manufacturer design tables and CMHA minimums against your actual soil and drainage conditions before a single stone gets set, so the footing depth matches your yard instead of a generic chart. For walls near that 4-foot threshold, sloped sites, or yards that already fight standing water, that site-specific judgment is exactly what keeps a wall standing for decades instead of settling within a few seasons.

Our Hardscape & Patio Installation team handles retaining walls from initial soil evaluation through final grading, and if your site’s real problem turns out to be water rather than wall height, our Yard Drainage Solutions team addresses that directly instead of building a wall on top of an unresolved drainage issue. A typical on-site consultation includes a hands-on soil check, guidance on whether your project needs a permit, and a written quote with a realistic timeline, so you know what you’re building before crews show up.
If your yard falls anywhere outside the simple, flat, well-drained case, reach out through our contact page and request an on-site estimate for your retaining wall project in Wentzville or St. Charles County.
Sources
A handful of resources back up nearly every number in this guide, and they’re worth keeping on hand if you’re planning your own wall:
- Reinforcement & drainage for block retaining walls — Rockwood Walls
- Segmental Retaining Wall Design (CMHA)
- Retaining wall calculator — Nicolock
- Wall embedment — Keystone
- Retaining wall drainage — The Spruce
FAQ
What is the 1/3 rule for retaining walls?
The 1/3 rule suggests burying roughly one third of a wall’s total height below grade. It’s a useful rough estimate, but manufacturer tables and CMHA’s embedment guidance give more accurate numbers based on wall height and toe slope.
Does a 2-foot retaining wall need a footing?
Yes. Even a 2-foot wall needs a compacted base and roughly 6 inches of embedment to prevent shifting, though the requirements are far less demanding than for a taller wall.
What is the rule of thumb for retaining wall footings?
A common practical rule is 6 inches of compacted crushed stone base topped by one buried course of block, giving roughly 12 inches of total trench depth for walls up to about 4 feet, per manufacturer guidance from Nicolock.
Does a 4-foot retaining wall need drainage?
Yes, and it needs more than weep holes. Walls at 4 feet and taller call for a 4-inch perforated drainage pipe bedded in crushed stone behind the base, since hydrostatic pressure at that height can overwhelm weep holes alone.
When should I hire a professional instead of DIYing my retaining wall?
Once your wall approaches 4 feet, sits near structures or vehicle loads, or your soil tests soft and wet, it’s time to bring in help. Precision Outdoor Solutions offers on-site evaluations that check soil conditions and permit requirements before any digging starts.
Recommended
- What Works Over 4 Feet: Retaining Wall Blocks For Homeowners (25+ Years)
- When A 4 Foot Wall Needs A Geogrid Retaining Wall For Homeowners
- Fix A Failing Retaining Wall: Homeowner’s Repair Guide
- Retaining Wall Drainage: A Practical Homeowner’s Guide
This article was prepared with AI assistance for general information. For recommendations specific to your property, contact Precision Outdoor Solutions. Call or text us at (636) 358-8644.